The new Remote Debugging feature in HALCON 13
2016-11-02 by Andreas Heindl

With HALCON 13 came the new Remote Debugging feature for the HDevEngine. This article describes how the Remote Debugging feature can be used in practice. The example creates a new C++ console application from scratch. With this description, it should be easily possible to incorporate the remote debugging into your existing C++ application, too.
Start Microsoft Visual Studio and create new C++ project
I used Microsoft Visual Studio 2015 Community Edition.
File / New project / Visual C++ / Win32 Console Application Name: e.g. TestDebugging (I also prefer to uncheck Precompiled headers)
Setup project to use HALCON 13
As HALCON 13 is brand-new, maybe you have opted to keep HALCON 12 as the main HALCON version during installation of HALCON 13. If you did - like me - you have to take care to set all of the following settings so that your test application does not e.g. use headers during development from HALCON 12 and libraries during runtime from HALCON 13.
In Solution Explorer, right click on the project “TestDebugging” and select Properties in the context menu. Make sure you have selected the same platform in this dialog (e.g. x64) as in the run configuration (as seen in the Visual Studio main window toolbar).
Then in “Configuration Properties / C/C++ / General” set: Additional Include Directories: C:\HALCON\HALCON-13.0\include
In “Configuration Properties / Linker / General” set: Additional Library Directories: C:\HALCON\HALCON-13.0\lib\x64-win64 (or C:\HALCON\HALCON-13.0\lib\x86sse2-win32 if you installed HALCON 13 for 32 bit)
In “Configuration Properties / Linker / Input” add:
Additional Dependencies: halcon.lib, halconcpp.lib, hdevenginecpp.lib
In “Configuration Properties / Debugging” set: Environment:
PATH=C:\halcon\halcon-13.0\bin\x64-win64
HALCONROOT=C:\halcon\halcon-13.0
Make sure to uncheck “Inherit from parent or project defaults” so that definitely no old library from HALCON 12 will be loaded when running your application.
Create HDevelop procedure
Start HDevelop, create an external procedure, e.g. test.hdvp:
test (:::Area)

read_image (Image, 'monkey')
threshold (Image, Region, 128, 255)
area_center (Region, Area, Row, Column)
return ()
Write example C++ code
You can remove the stdfx.h and stdfx.cpp files from your project if you do not use the precompiled headers option.
Adapt the main C++ program to look something like this:
#define WIN32_LEAN_AND_MEAN
#include <windows.h>

#include "halconcpp/HalconCpp.h"
#include "hdevengine/HDevEngineCpp.h"

#include <iostream>

HDevEngineCpp::HDevEngine engine;

void TestHDevEngine() {
    try {
        engine.AddProcedurePath(R"(C:\debug-hdevengine\TestDebugging2\procedures)"); // TODO: CHANGE ME
        engine.SetEngineAttribute("debug_password", "pass"); // TODO: CHANGE ME
        engine.SetEngineAttribute("debug_wait_for_connection","true");
        engine.StartDebugServer();
        HDevEngineCpp::HDevProcedure proc("test");
        HDevEngineCpp::HDevProcedureCall proccall(proc);
        proccall.Execute();
        auto areaTuple = proccall.GetOutputCtrlParamTuple("Area");
        auto area = areaTuple.L();
    }
    catch (HDevEngineCpp::HDevEngineException& e) {
        auto msg = e.Message();
        std::cerr << "HDevEngineException:" << msg << '\n';
    }

}
//

int main()
{
    TestHDevEngine();
    do
    {
        std::cout << '\n' << "Press enter to quit.";
    } while (std::cin.get() != '\n');
    return 0;
}
Start debugging
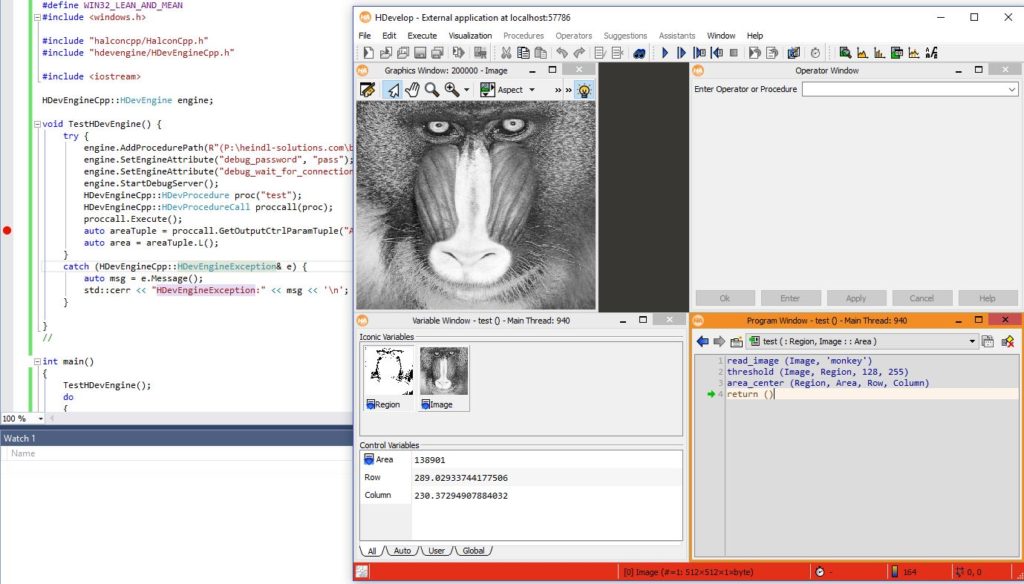
Switch back to Visual Studio, leaving HDevelop open. Build your project (press F7) and start debugging your application in Visual Studio (press F5). When running for the first time, you will have to “Allow access” when the dialog box “Windows Firewall has blocked some features of this app” appears.
Because of the line
engine.SetEngineAttribute("debug_wait_for_connection","true");your application will not return from
proccall.Execute();until you attach HDevelop. Attaching HDevelop for remote debugging is a simple as going back to HDevelop and selecting the menu entry Execute / Attach to process… . The default setting for host (localhost) and Port (57786) should work well. Press OK. Then enter your password and confirm. You will now be in remote debugging mode in HDevelop. A red indication at the bottom of the screen will appear. You can now inspect the variables of your remote HDevEngine and run the script, even line by line. When execution reaches the return () statement, your C++ application will continue to run.
Pro tip
Unfortunatelly, HDevelop cannot attach automatically to the debugged process as soon as the the debugging server is available. This would be very convenient. I have written a little Visual Basic Scripting program to listen for a HDevEngine debugging server at port 57786. If this port is listening and there is an open HDevelop process, this HDevelop will be triggered to attach to this port and start debugging.
' attachHDevengineDebugger.vbs
' (C) 11/2016 Andreas Heindl, http://heindl-solutions.com/
'
' wait for the HDevEngine debug server to become available. As soon as port
' 57786 is listening and there is an open HDevelop process, this HDevelop
' will be triggered to attach to this port and start debugging.
Sub Attach()
Set Processes = GetObject("winmgmts:").InstancesOf("Win32_Process")

For Each Process In Processes
    If StrComp(Process.Name, "hdevelop.exe", vbTextCompare) = 0 Then
        With CreateObject("WScript.Shell")
            btn = .Popup("Remote debug using HDevelop?", 0, "HDevEngine Debug Server detected", &H3 + &H20)
            Select Case btn
                case 6 'Yes
                    .AppActivate Process.ProcessId
                    WScript.Sleep 300
                    .SendKeys "%x" 'open E&xecute menu
                    WScript.Sleep 100
                    .SendKeys "a{Enter}" '&Attach to process
                    WScript.Sleep 300
                    .SendKeys "{Enter}" 'Accept defaults in dialog: localhost:57786
                case 7 'No
                case 2 'Cancel
                    WScript.Quit()
            End Select
        End With
        Exit For
    End If
Next
End Sub


Set fso = CreateObject("Scripting.FileSystemObject")
Set objShell = CreateObject("WScript.Shell")

tempFile = fso.GetSpecialFolder(2) + "\" + fso.GetTempName()
strCommand = "cmd /C ""netstat -an |findstr "":57786.*LISTENING"" >" + tempFile + """"
ForReading = 1
notFound = false
While true
    objShell.Run strCommand, 0, true
    Set f = fso.OpenTextFile(tempFile, ForReading)
    if f.AtEndOfStream then
        notFound = true
    elseif notFound = true then
        Attach()
        notFound = false
    end if
    f.Close()
    WScript.Sleep 1000
Wend
Downloads
Questions?
If you have any questions regarding this topic or and other HALCON related questions please do not hesitate to contact us.